11-16 Ford F250 / F350 Super Duty - Definitive Flow-Through Center Console Install Guide
FOREWARD
On the 2011 - 2016 F-Series Super Duty trucks, the lower end models were specced with a front bench seat, with the folding middle seat also serving as a center console. These serve their purpose, however people may find the cup holders to be lacking, and the dead space a bit of a waste by their feet. In this guide we will be going over everything you need to know and do, to properly install one of these center consoles.
PREREQUISITES
For this job we will need the following tools and items:
Socket Set (Sizes from 5mm to 21mm are needed)
1/4, 3/8, and 1/2 wrenches / impact drivers
Various socket extensions
Screw drivers
Picks / Trim Tools
Wire Strippers (and wire + solder joints / soldering iron)
Misc. other tools may be needed
Items to order:
Dash Bezel: BC3Z-2504608-CB
Airbag Control Bezel: BC3Z-25047A04-BA
Obviously you will also need a complete center console, however they can no longer be ordered new from Ford and will have to be found on a local marketplace. Make sure to check the one you buy comes with all the various bolts, covers, brackets, etc.
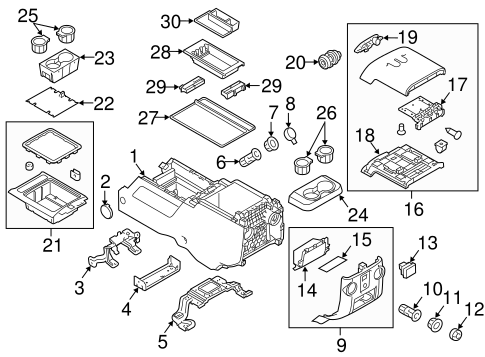
For the full diagram with parts, go here: https://www.oemfordpartsdirect.com/v-2013-ford-f-250-super-duty--xl--6-2l-v8-flex/body--front-console
We will be referring back to this diagram at certain points in the install.
Build Process
Center Console Prep
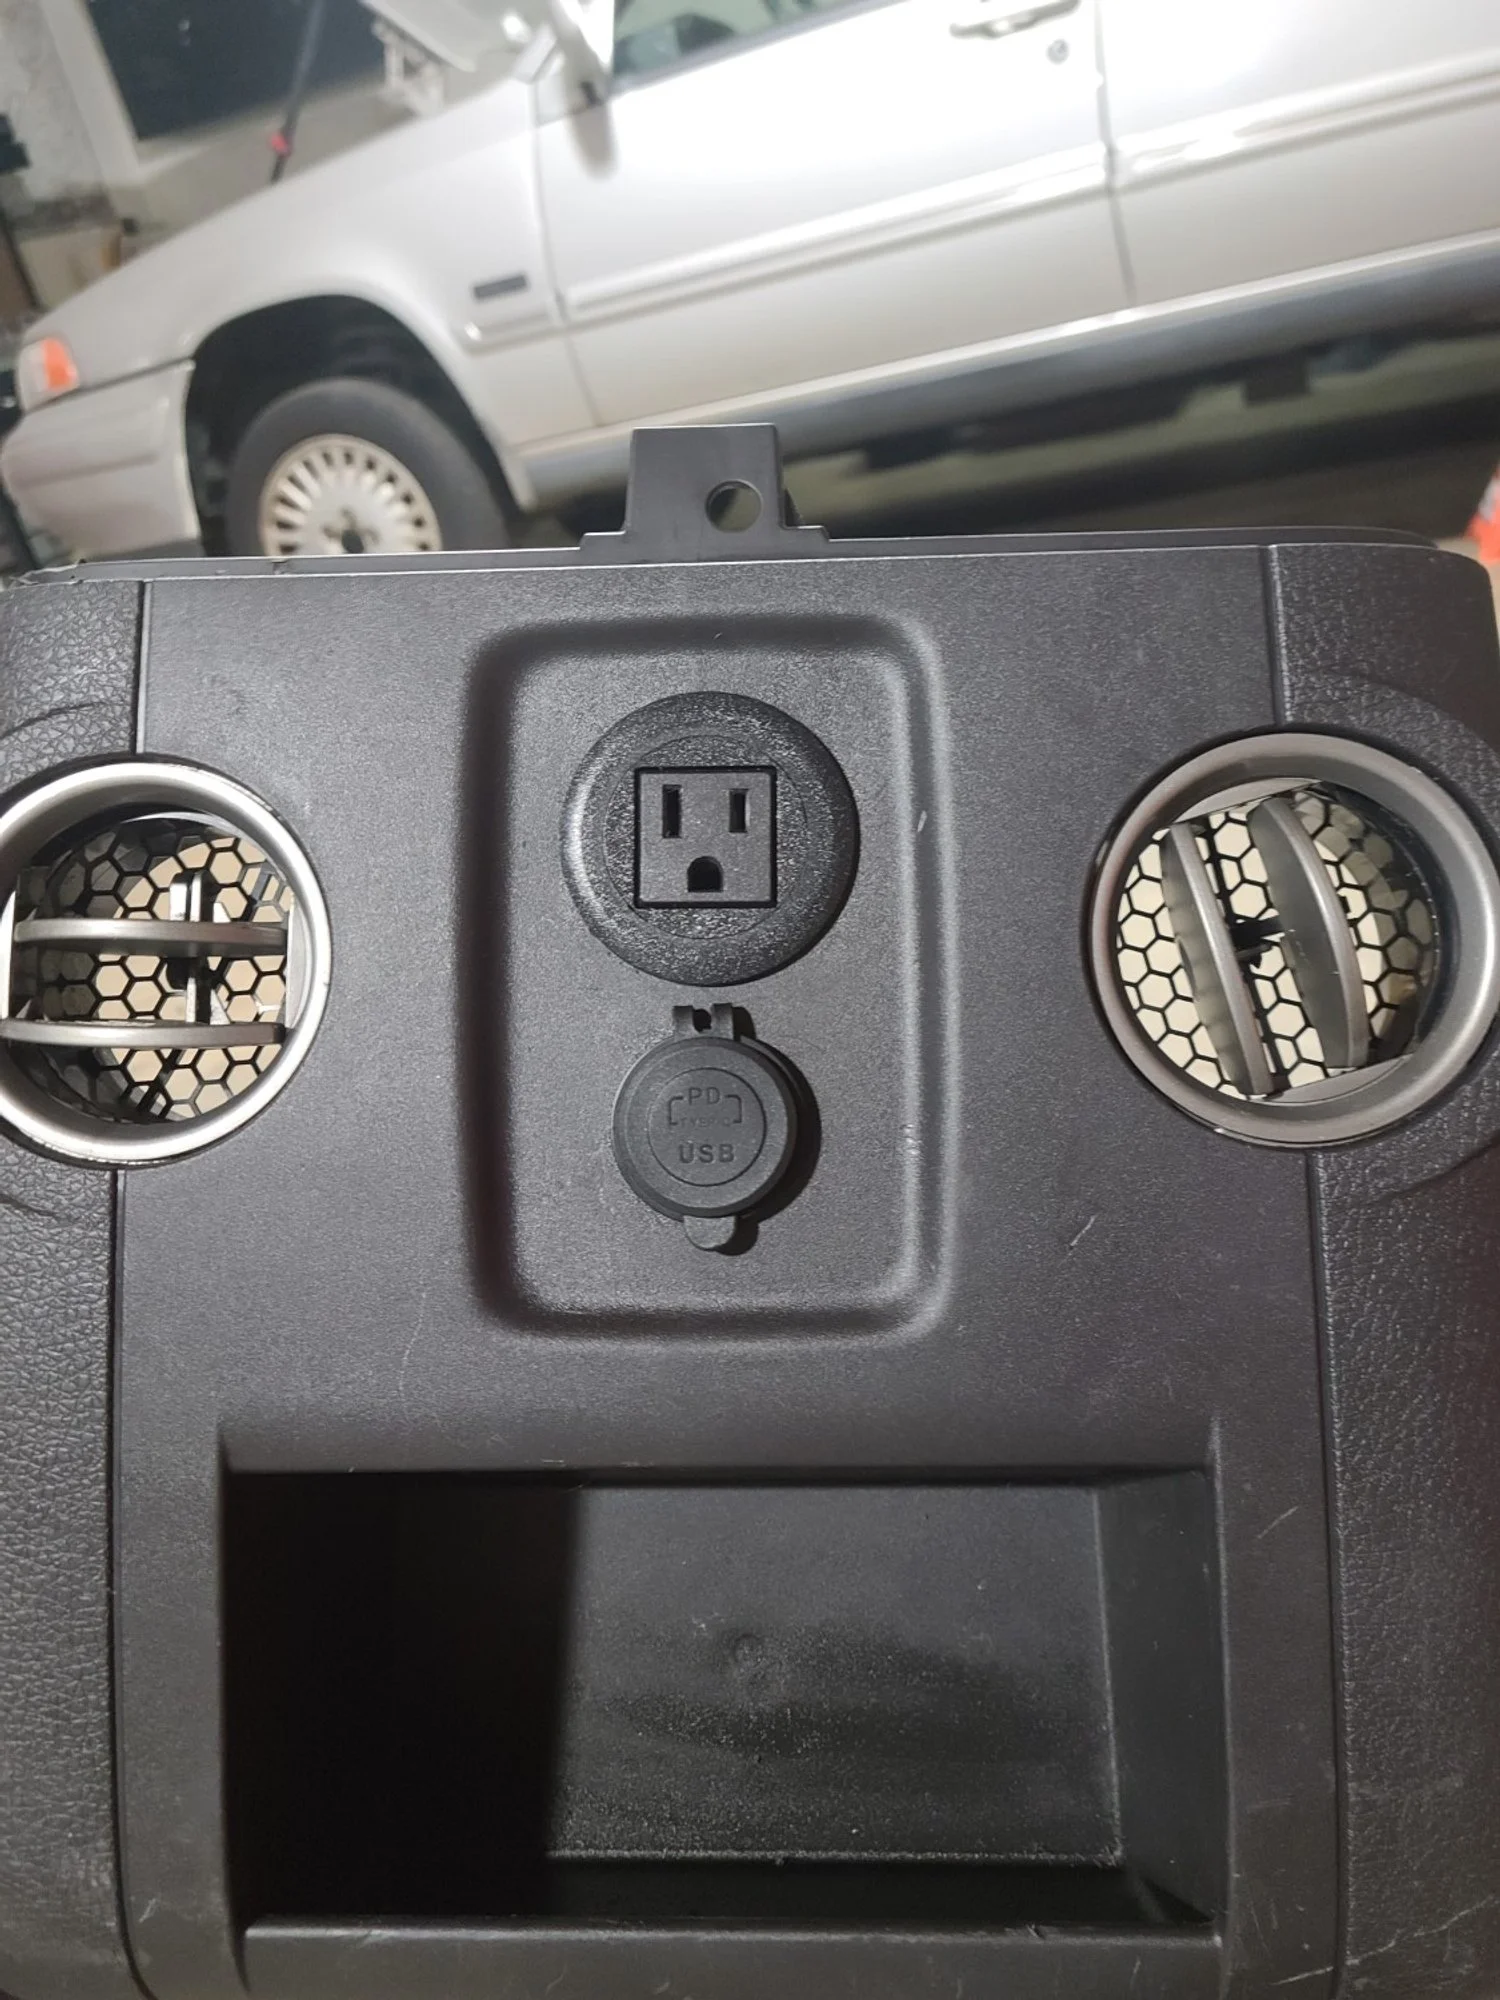
From the factory, the flow through console has 3 additional power ports installed. 1 110V inverter outlet, and 2 standard 12v lighter sockets. On higher trim trucks, there is a harness under the carpet that runs to single plug on the side of the console to give these ports power. However on a XL trim truck, such harness is not there. Additionally the inverter needs a CANBUS signal to turn on and off, which can be a pain when trying to integrate the OEM inverter. For this project, I ended up buying a basic inverter off Amazon, which had the same 150W output as the stock inverter. (Its worth noting this is a very small amount of wattage, and a much beefier inverter could be easily fit into the large space of the center console for powering high wattage power tools).
In the above diagram, I removed panel 9 to replace he 110V plug and the lighter socket. Since the OEM 110 plug has a proprietary harness, I replaced it with a “screw in” type that is designed for a desk or other flush mount applications, this means I can easily plug it into the output of the inverter.
Links to the items used:
I used basic Velcro strips from Lowes to hold the inverter in place inside the panel. I used TESA tape on all the wires in different areas to prevent anything from rattling around when installed.
The installation required a little bit of dremeling / filing of the stock mounting points so that the round barrel of the flush mount kit could be installed.
For power I made 2 very simple harnesses. The 150W inverter got its cigarette port end chopped off, and replaced with a basic 2 pin deutsch connector. This harness will connect to Upfitter switch 1 under the dash which can supply up to 25A, and is a switch power source. The OEM lighter socket under the arm rest and the rear 12V USB port were wired together to share power and ground, and were also given a 2 pin deutsch connector. I used different ends on the 2 harnesses on the center console so they could not be mixed up when connecting them to the truck side harness.
Interior
Starting off we need to remove the two regular seats from the cab of the truck, along with the center jump seat. To remove the two main seats you need to first remove the circular covers on the feet.
Photo of one of the rear seat bolt covers. The small trim screws do not need to come off, letting the piece stay attached to the foot. Just remove the center circle with a pick.
There is one on each foot of the seat (4 per seat) and you will now have access to the 21mm bolts that hold everything in place. Undo these 4 21mm bolts.
Now with the seat unbolted, lean it back so you can access the harness. Pull the grey handle down to release the harness from the seat. Repeat this process on the passenger side.
To remove the center jump seat, there are 2 bolts on the back feet which are directly accessible. The two remaining bolts holding the seat in require the bottom hold of the seat to be folded up.
There are trim clips holding the seat bottom down, pop these out and lift to access this area while the seat is in the truck.
With the 4 bolts from the jump seat removed, it can be lifted up and out of the vehicle.
I removed the rubber flooring of my truck to install carpet, but this gives a better view of where the bolting points are in the vehicle.
In the above photo, you can see the green boxes are where the drivers seat bolts through the cab, and the orange shows the 4 standoffs for the middle jump seat / flow through console mounting points.
With the interior space now freed up, I installed my carpet and also ran the 2 lines for the plugs into the center console. These can also be installed over existing carpet since the console would cover them.
The power for the inverter went to upfitter switch 1, which is the solid yellow wire under the dash. As previously mentioned, this is a 25A circuit with its own switch on the dash and fuse, so it should be able to handle the 150W inverter without issues.
Once the wires were in place, I installed the center mounting bracket for the center console. This is held in with 2 of the bolts removed from the jumpseat (the ones under the front of the seat). This is part #4 in the diagram at the top.
The center console mounts to this via 2 7mm bolts on the sides.
With the mounting bracket in place, and the wires run we now need to replace some dashboard trim. From the factory the XL trim trucks have a flip out cup holder below the radio and AC controls, this panel will be replaced with the bezel mentioned in the beginning that needs to be ordered. To replace this, we need to remove the face plate of the dash along with a couple bolts.
This guide does a good shop showing how to access these bolts and get to the panel: https://www.youtube.com/watch?v=AnhCNoWoSBo
While that guide is showing how to install cup holders on an even more basic trim truck, the steps are identical for the new “slot” piece for the flow through console to connect to.
Removing the panel under the steering wheel also makes it very easy to access wiring and everything else youll need to install. The faceplate is held in with 2 7mm bolts and the rest is clips, whereas the bottom cup holder is held in with 3 7mm bolts (one hiding behind the lower part of the panel under the wheel) and two living behind the face plate. Additionally there are the 2 Torx bits in the middle (which you can see the holes for in the above photo) which also need to be removed.
Now it is worth pointing out that my center console came with the front mounting bracket (part #3 in the diagram). This supports the AC vents for the console. Since I was not planning on removing my whole dash to install the piece to have air flow through my console, I removed this bracket and the AC vent piece from the underside of the console.
The removed piece from the flow through console. On trucks where you have AC passing through to the rear vents, this is used to connect to the dash air system. For my setup, it was not needed.
I have not noticed any structural issues with it being removed.
The piece pictured above will need to be replaced. The item to order is mentioned in the beginning, and the lock barrel moves to the small trim piece with 3 5.5mm screws.
Now with the new lower trim piece installed, we can button the dash back up and then slide the center console into place. The two rear feet fit over the existing bolts, and line up the bolt holes on the sides to screw the 7mm bolts into the center support bracket. The console has guide pins which do right into holes in the new dash trim to keep everything aligned.
NOTE: When I re-used the nuts for the rear standoffs the hole in the center console foot was too large and the nut went right through it. I made a small washer for the one side which fixed the issue.
With the center console in place you can put the optional trim pieces over the rear feet. Installing the seats is the same process as removal but in reverse.
Once the seats are back in, the install is done!
Conclusion
There are a few parts of the process I wish I had gotten better photos of. I plan on making a video supplementing this guide which can show some more areas I had any issues with or I want to make even more clear. If you have any suggestions or edits you would like to see made, please leave them in the comments below, thanks!


