
NordCarolina Blog
Formerly BoostMoose.com
VDASH Pt. 2 - Cloud Based Car Tuning
So I finally got around to getting the laptop and DICE unit out for creating pt. 2 of this series. I have had so many responses to the blog and I am glad it has been a help to so many people!
When we left off, we had just gone through the process of cracking the CEM, no we can go through the features!
For these examples I will be going over the 3 features that I added, however the process is the same for any modification you want to add. The first page you will see after loading is the homescreen, here you will see a basic readout from the car and your information.

From here you will hit Connect, and make sure your car is in Ignition Position 2, if it is and you continue to get an error, just click ignore. The VDASH program can do it for you when it does any CEM changes. Keep in mind, you should have the car still connected to the battery tender for this.
Now we will be on the full detail page, on this page you will get a readout of all the CEMs information and codes. Don’t worry, these are stored codes and may not be active codes in the system. On this page, you will go to Advanced, this is where we can make all the changes we want.

1. Automatic Headlights
The first mod that I did was activate the auto headlights for my car. For the 2012MY, the cars were equipt with light sensors, but only used them for the gauge and interior dimming. With a 2013MY+ headlight switch, we can add auto headlights to the car!
The part I ordered was 30739428, and the installation is as simple as taking off the side panel of the dash and pushing the old one out, and plugging the new one in. Now that the part is in, we need to able the feature in VDASH. This option can be found under Lighting > Dipped Beam.
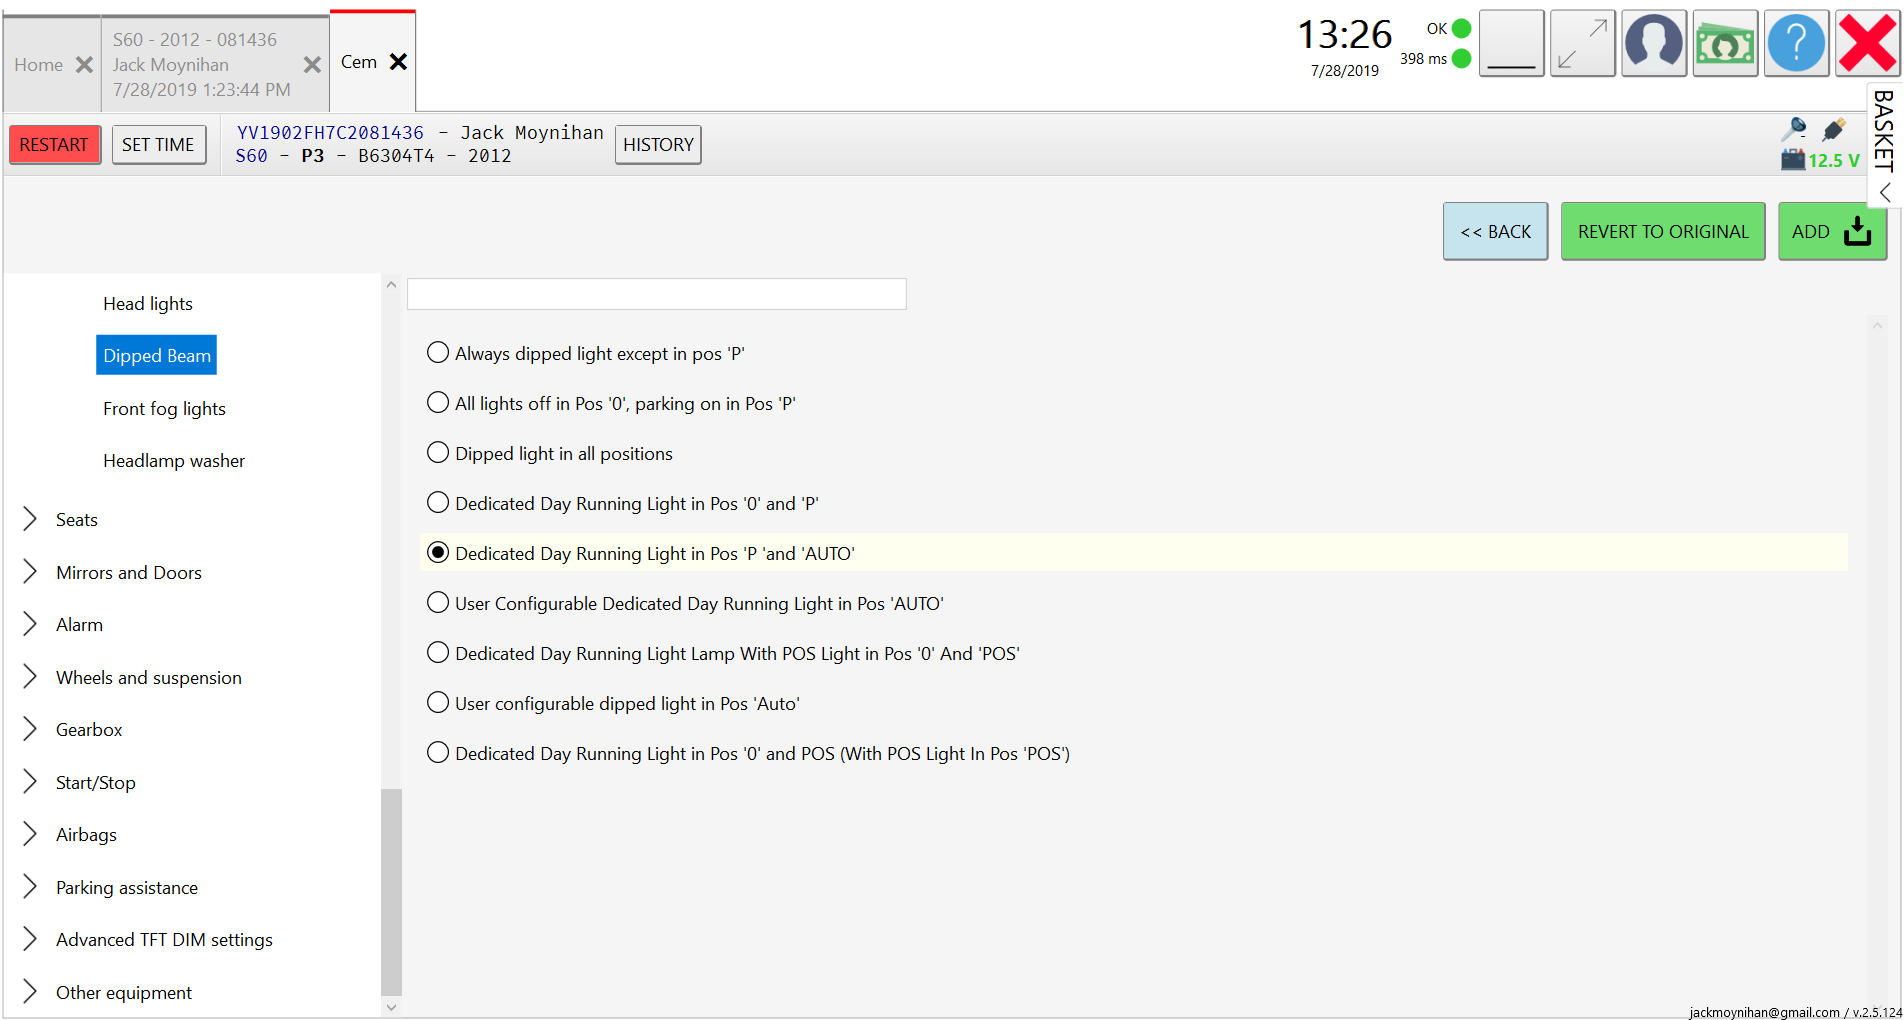
Once you have selected the configuration you want, click the green Add button. This adds this modification to the cart. Its worth noting that once you purchase a modification, you can select any option within that group at a later time and change it for free.
2. Window Key Controls
The second modification I did was the Global Open / Close, which is the option to open and close the windows with the PCC key. Many Volvos, pre P3, have this option from the factory however it was removed for the US market. This option is found under Mirrors and Doors > Global Open / Close (via Remote). I set mine to only do the windows, without the sunroof, but this can be changed later for free if I wanted.

3. Remote Start
The last option I added was remote start. This allows you to use the PCC key to start the car remotely. After it is activated in VDASH, you must lock the car and then press and hold the Lightbulb button on the key for 10 seconds or once you see the lights start to flash. If the car is too low on gas it will not work!

4. Removing the Speed Limiter
Now this isn’t an option I used since the Polestar tune removes the speed limiter. However I realize that this will be a popular reason that people use VDASH.
The option to change the limiter is located under the main tab of Market Related Settings > Speed Limiter. There are a few options to choose from, with an option to try the beta Unlimited feature.
VDASH Pt. 1 - A new tool for a modern Volvo hacker
Owning a 2012 P3 S60 means that there are a lot of features that were added to later models, or removed from the car for the US market. Some of these features include remote start, remote window controls, and even automatic headlights. Luckily there is a tool to add these features in, and it is called VDASH. VDASH is a program that connects through a Volvo DiCE system to crack the CEM and modify options on the car. The program is ‘payment” based, and requires a few hundred dollars to unlock all of the options you will want to add. For reference, remote start, TFT digital dash modifications, and auto headlights costs around $40 in options from VDASH, a far departure from the hundreds of dollars a dealer would charge just to add remote start.
For my car, I was able to add in remote start, window key controls, and auto headlights (with the addition of the appropriate parts, but I will get into that later).
Part 1 - Installation and Setup
Before we begin, you are going to need the following equipment:
Windows PC, preferably with a decent CPU
Volvo DICE Tool, these can be found on AliExpress for around $80, and can be helpful for DIY projects such as this as well, as diagnostics with Volvo VIDA.
Battery Tender (capable of over 7A)
VDash Software, download from D5T5
I have made a copy of the VDASH folders available as a downloadable ZIP
Once you have installed the program, you will be asked to make an account. Unless you are a shop, you are best served with the free account not the subscription. Connecting to your car is as easy as plugging into the OBD2 port with your DICE connector, and plugging its USB connector into your laptop. If everything is ready to go the program will be able to read data from your car and it will show up on the bottom of the screen.
If you are planning to crack the CEM, connect your battery charger beforehand! This process can take a while, and it will automatically stop reading your CEM if the battery charge falls too low. Since I was using an outdoor plug, I made sure to also buy an extension cord with a 3 female end. This way I could have my battery charger and laptop plugged in for the process.

I used a Black & Decker car battery charger that had a peak charge of 15A, with the ability to do 40A. It had a nice screen that showed the battery percentage, as well as charge rates.
Part 2 - Running VDASH & Cracking the CEM
Once you have connected your PC to your car, it should be fairly obvious in the VDASH program that it is working. You will get multiple different readouts from the vehicle. From here you can go to the lower right corner to the button that says Decrypt CEM. This process can take a while, and can be affected by your CPU speeds. (So your old dual core HP may not be the best choice!) You will also need a stable connection from the PC to the internet, as your progress is saved online, and data is transmitted to the VDASH developers. I highly recommend you start this process at night, as your car will not be drive-able while the program is working. You can stop the process at any time, and pick up where you left off. I left my DiCE unit hanging in a location that I could see the lights blinking. If you see that none are blinking during the brute force crack, then the process has either stalled for some reason, or it is done. For my personal car, I actually used my desktop computer which allowed me to finish in around 6 hours.
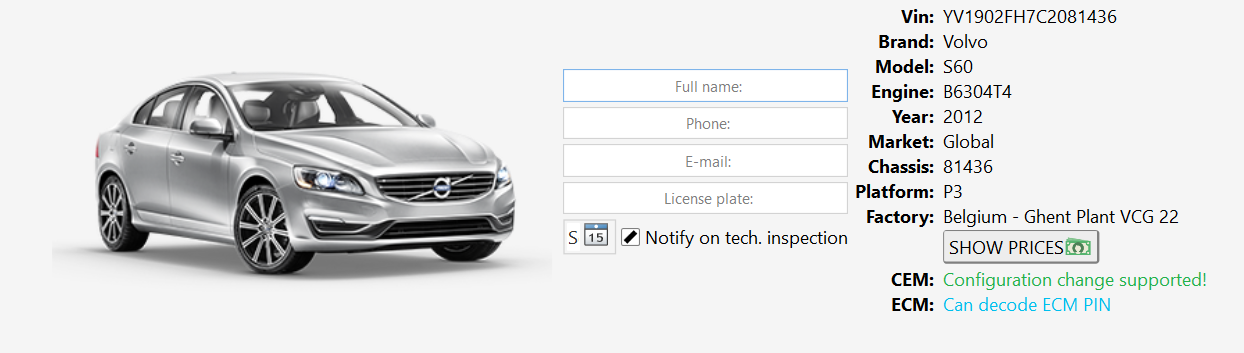
This is the screen you should get when the car is connected. (Where mine says CEM: Configuration change supported will show an UNLOCK CEM button, for those cars that are not unlocked yet).

My desktop has a i7 5820k (6 cores), which allowed me to brute force this decryption much faster.
Once the process is complete, we can now go into VDASH and begin to configure car settings. I will be covering all of my mods in part 2 of this write up. I will be covering things such as auto headlight installation for 2011 and 2012 cars, as well as adding remote start and global window controls. I will also be showing many of the other features available in the app that I did not add to my car, or are not applicable for my S60. Stay tuned!
The P3 Common & Uncommon Repairs Documentation Project

One of my goals with the website, as with many of my projects, is to act as a repository for information. My new endeavor, is going to be cataloging all of the issues I had come up with my 2012 S60 on the P3 platform. In each of my posts, I will try to describe accurately what my issues were, and how they were fixed. I will also try to include information from the repair sheets along with part numbers and labor time. My goal is to make it so that people encountering these issues will be able to find my site and use it to self-diagnose their car. Each repair will be a single post, with pictures (if needed). This content will hopefully make up a good amount of posts until I can start a new Volvo project.
Archive
-
2025
- Dec 15, 2025 11-16 Ford Super Duty Remote Start Ultimate DIY Guide Dec 15, 2025
- May 5, 2025 Volvo 700 Series In-Tank Fuel Sender Assemblies - Whats the deal? May 5, 2025
- Apr 28, 2025 Store Update: Shipping Rates and Carriers Apr 28, 2025
- Jan 1, 2025 Cash for Clunkers and Todays Car Marketplace - A Mathematical Analysis on Why Cash For Clunkers Doesn't Matter Anymore. Jan 1, 2025
-
2024
- Nov 25, 2024 11-16 Ford F250 / F350 Super Duty - Definitive Flow-Through Center Console Install Guide Nov 25, 2024
- Jul 30, 2024 13-16 F250 Steering Wheel and Audio Control Upgrade / Retrofit Guide for Dummies Jul 30, 2024
- Mar 13, 2024 Misc. Project - Volvo P3 Desk Chair Mar 13, 2024
- Jan 16, 2024 The Definitive P2 XC90 External Transmission Cooler Writeup Jan 16, 2024
-
2023
- Aug 8, 2023 TFT Display with P3Tool Guide Aug 8, 2023
- Aug 4, 2023 Facility Upgrades and Updates Pt. 2 - Tow Dolly Aug 4, 2023
- Mar 27, 2023 Facility Upgrades and Updates Pt. 1 - John Deere 165 Hydro Restoration Mar 27, 2023
-
2022
- Sep 27, 2022 P3Tool - Volvo Hacking Takes Its Next Big Step Sep 27, 2022
- Aug 25, 2022 Project Nashville Pt. 3 - MOST Excelent! Aug 25, 2022
- Jun 28, 2022 NordCarolina Shop Update! Jun 28, 2022
- Jun 20, 2022 Project Nashville Pt. 2 - Tech Talk Jun 20, 2022
- May 12, 2022 And I Would Drive 500 Miles - Project Nashville Pt. 1 May 12, 2022
- Mar 14, 2022 On life, cars, and business. Mar 14, 2022
-
2021
- Jul 19, 2021 Volvo 960 Project Pt. 6 - Still Alive Jul 19, 2021
- Mar 12, 2021 Volvo 780 Bertone Project Pt. 2 - Why buying another persons project is the WORST. Mar 12, 2021
-
2020
- Dec 7, 2020 Volvo 780 Bertone Project Pt. 1 - In Over My Head Dec 7, 2020
- Dec 7, 2020 Volvo 960 Project Pt. 5 - Taking my time. Dec 7, 2020
- Sep 11, 2020 A Very Volvo September Sep 11, 2020
- May 15, 2020 960 Project Pt. 4 - End of Spring Almost Summer Updates May 15, 2020
- Feb 3, 2020 960 Project Pt. 3 - Always Remember Your Oil Feb 3, 2020
-
2019
- Dec 17, 2019 Nord Carolina - Starting my own E-Commerce Platform for Volvo Enthusiasts Dec 17, 2019
- Nov 20, 2019 960 Project Pt. 2 - I built it one piece at a time... Nov 20, 2019
- Oct 2, 2019 960 Project Pt. 1 - Diving In Oct 2, 2019
- Sep 20, 2019 1997 Volvo 960 Project Pt. 0 - $800 Worth of Headaches Sep 20, 2019
- Aug 3, 2019 VDASH Pt. 2 - Cloud Based Car Tuning Aug 3, 2019
- Jul 2, 2019 VDASH Pt 2. is coming.... Jul 2, 2019
- Apr 1, 2019 VDASH Pt. 1 - A new tool for a modern Volvo hacker Apr 1, 2019
- Mar 18, 2019 2013+ Shifter Retrofit Project Pt. 2 - Reconstruction and Installation Mar 18, 2019
- Feb 17, 2019 2013+ Shifter Retrofit Project Pt. 1 - Preparation and Disassembly Feb 17, 2019
- Feb 2, 2019 The P3 Common & Uncommon Repairs Documentation Project Feb 2, 2019
-
2018
- Dec 28, 2018 Mini-Post: New side skirt. Dec 28, 2018
- Dec 8, 2018 Driveability and Performance Report: December 2018 Dec 8, 2018
- Oct 8, 2018 Audio Modules & The Return to Boostmoose Oct 8, 2018
- Jul 28, 2018 The Final Report: 850R Beauty Shots Jul 28, 2018
- Jul 17, 2018 Mid-July Summer Update Jul 17, 2018
- May 15, 2018 Summer Progress Update May 15, 2018
- Apr 1, 2018 850R - Stage 0 Dreams Pt. 2 Apr 1, 2018
- Mar 18, 2018 850R - 960 Throttle Body Upgrade pt. 1 Mar 18, 2018
- Mar 14, 2018 850R - Seat Restoration Mar 14, 2018
- Jan 18, 2018 S60R - Wrap Repair + Driving the Eastern Shore Jan 18, 2018
- Jan 1, 2018 S60R - Vinyl Wrap Jan 1, 2018
-
2017
- Dec 4, 2017 850R - Better and Brighter Tail Light Installation Dec 4, 2017
- Dec 4, 2017 S60R - Holiday Charity Laps at Virginia International Raceway Dec 4, 2017
- Nov 16, 2017 850R - Junkyard Pulls for Performance & New Rear Lights Nov 16, 2017
- Nov 15, 2017 S60R - Scheduled maintenance.....yawn. Nov 15, 2017
- Nov 3, 2017 850R - Stage 0 Dreams Pt. 1 Nov 3, 2017
- Nov 1, 2017 850R - Firestone Fixes CV Axle while Suspension Nears Completion Nov 1, 2017
- Oct 28, 2017 850R - Axle Removal and CV Boots Halt Progress Oct 28, 2017
- Oct 27, 2017 850R - Air Tool Woes and Broken Brakes Oct 27, 2017