
NordCarolina Blog
Formerly BoostMoose.com
Cash for Clunkers and Todays Car Marketplace - A Mathematical Analysis on Why Cash For Clunkers Doesn't Matter Anymore.
Foreword
Its often brought up in various forums, facebook groups, Twitter threads, etc that Cash for Clunkers is the epoch of our current used car market pricing. To many, this program symbolizes everything wrong with “evil guvernment” and how it was a dirty trick to hurt the lower classes and working man. So lets answer the question with numbers and data, does the fallout from 2009s Cash for Clunkers still really linger to this day?
History
Cash for Clunkers was a program put into place in 2009, with the basic premise of offering incentives to get consumers to trade in an old used car and get credit towards buying a new car. The program had some basic caveats that a car had to meet to be eligible:
Younger than 25 years old (which in 2009 would have made the age limit at 1984)
Combined MPG of 18 or less.
“Driveable” condition.
Now I’m sure certain locations were more or less strict on what “driveable” meant. I wouldn’t have known since I was the ripe age of 12 in 2009, so my concerns with government programs to help the post-recession economy were greatly drowned out by computer games, Xbox live, and generally being a dumb middle schooler.
By the time the program ended, the rough total of vehicles scrapped under this program was just under 700,000. (The real number being a reported 677,081). For this report I am going to ignore the car enthusiast trap of getting upset over “rare” cars being crushed. I have personally been in many junkyards due to the nature of my business, and around rare obscure cars long enough to know that just becuase something is rare, doesn’t mean the person who owns it cares. I could go on about this, but I think that’s a topic for the end of this story.
The Data
For reference and transparency, the official spreadsheet of this data can be found here:
Additionally all of this data comes directly from the NHTSA page for CFC as archived by the Wayback Machine.
So lets start by breaking down this data into some top level overviews so we can get an understanding of what we are working with:

So the first thing we see is that the number of vehicles classed as Trucks and SUVs make up a significant portion of the data. This tracks given the <18 MPG requirement of the program. However, its worth noting that the way they classified vehicles into the 3 “Truck” categories and the “Passenger Vehicle” category seem to have almost no bearing on the shape of the vehicle. There is everything from Audi wagons to Mercedes coupes in the Truck class, and then F-150 trucks in the Pass. Vehicle class. A better overview is breaking it all down by make/model:
Junkyards
Now, let us do some math to get a very very rough number on how many vehicles are being scrapped per year. Now I want to preface this by saying these are rough estimates, however the results will be quite shocking as they are grossly LOWER than the actual number. The data collected here was calculated with the following:
Data from 8 LKQ “Pull Your Part” Junkyards, all in the South Eastern Coastal area of the US. The data was collected from October 1st to December 30th. Additionally, all this data is available for download. I used a data mining software to collect the Year, Make, Model, VIN, and entry date of every vehicle in each yard.
What we are looking at here is the amount of vehicles that were processed and put out into the yard for customers to pull parts from at each location. All of these are trimmed down to Oct. 1 to Dec. 30th, with some already having removed their early October inventory. I tried to get a coverage of a few months since the number of intake vehicles most likely varies during the year, and I do not have a complete enough data set to cover a years worth of inventory yet.

It is worth noting that LKQ has 70 locations across the United States, with most of their yards being in the south and western parts of the country. I highly doubt that LKQ would release a full dossier of information containing historical intake data, however I am sure the insights of such data would be fascinating to see.
Getting back to the data, we can have Excel calculate that in the roughly 3 month period an LKQ yard sees about 1055 cars. Now lets times that by 4 to cover all 4 quarters of the year and we get 4218 cars per year on average. Now that data is for one yard, and LKQ as a corporation operates 70 “Pull Your Part” locations. So lets multiply that by 70 and our rough yearly average for the LKQ Corp. is 295,260 vehicles.
Folks, that is nearly 300,000 vehicles a year just based on rough mathematics using a sample area that I am sure is dwarfed by higher trafficked yards in the western part of the country. This also doesn’t include the thousands of other junkyards across the country whether they be big corporate entities like Pull-a-Part and Pick-N-Pull (creative names I know), or mom and pop operations that are littered all throughout rural America. If you ever doubted the sheer scale of vehicle scrapping and recycling in the United States, I highly recommend you (virtually) travel down Dr. Martin Luther King Blvd in Phoenix, Arizona.

This street feels like miles upon miles of just auto glass, tires bumpers, engines you name it. I recently traveled down this road when I was in PHX for work, and plan on going back just to get drone footage of it all.

The sheer scale of these places can only be felt at ground level since many of these scrap yards have their vehicles stacked multiple cars high.
You may also note that I am going out of my way to specify this is data for the customer facing locations, this is becuase LKQ is not just a junkyard for older vehicles. They are a full time dismantling business, which is why you wont see many brand new vehicles at these locations. They are kept in separate facilities where they can be professionally broken down and their parts sold to body shops and repair shops to keep cars on the road. This leads me to another interesting data point I wanted to compare between the CFC vehicles and the scraped data list, average vehicle age.
The data here shows something I already knew, but was still shocked at the pure uniformity of it. The average age of a vehicle being scrapped in the US is almost exactly 20 years old.
As for the CFC Data here are the top 10 makes that were the newest when scrapped:
Roush Performance (2): 2006Saturn (1): 2005Suzuki (1307): 2001Kia (3181): 2001Hyundai (566): 1999Honda (3284): 1998Aston Martin (1): 1997Land Rover (2158): 1996Infiniti (2974): 1996Chrysler (11226): 1995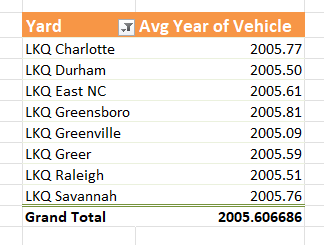
And here are the oldest average vehicles scrapped in CFC:
Merkur (42): 1987Porsche (11): 1987ASC Incorporated (4): 1987CCC Engineering (1): 1987Excalibur Auto (3): 1987Maserati (6): 1986Lambda Control (3): 1986American Motor (68): 1985TVR Engineering (1): 1985AM General (12): 1984The average age of a CFC car was built in 1994, which when the program was occurring was a roughly 15 year old vehicle. (In 2009). That means those same vehicles today would be swiftly approaching the 30 year mark. Old enough in most states to qualify for a Historic Tag.
Export Markets
While most of my writing thus far has been regarding junkyards where vehicles are scrapped / dismantled, there is also a massive market for US exported vehicles. Lots of these cars are cheaper commuter cars that end up at IAA auctions when traded in at dealers, or cars sent to Copart lots when insurance totals them out. Parts of South America, Africa, and Eastern Europe have low enough labor rates, while having access to body shop tools that make these repairs more economically viable and give a lot of these cars a second life. A quick look at Copart auctions or even the Copart subreddit, shows that most of the newer vehicles bought from Copart are being bid on from outside of the US.
Reports put the amount of used vehicles exported out of the US yearly well over 1,000,000. This is again more cars per year than C4C killed during its entire program.

A US-spec Dodge Challenger with Ukrainian plates.
The Actual Purpose of C4C
As I was wrtting this article, another C4C ragebait thread got posted on reddit. Thankfully the discourse was pretty level-headed with many commenters agreeing with the fact that this program, while killing a handful of enthusiast vehicles, was overall a culling of some truly miserable 80s-90s cars. A lot of enthusiasts also forgot why the program existed in the first place, to get some sort of life-line back into the automotive economy which was getting absolutely massacred for obvious reasons in the 08-09 downturn.
There was a very poignant comment in the thread too which I wanted to highlight which touches strongly on the whole reason it existed in the first place:
It's a rehashed dig for car enthusiasts who like to blame the admin at the time, but people seem to conveniently forget that the auto industry was devastated the second people suddenly couldn't get HELOCs to buy that shiny new Suburban anymore and the 10 houses they owned 0 money down were all going into foreclosure. I worked in consumer finance tech back then and it was not a good place to be.
Several thousand new car dealerships closed from 2008 - 2009
C4C only accounted for ~40 cars per dealer back then and car sales were down an overall 40%. Dealers averaged ~1k sales each which meant C4C would have only gotten ~10% of what they lost in that 2009.
Keeping people employed and getting any amount of money moving in the economy was the immediate goal of the program, not some grand conspiracy to immobilize the masses 20 years later by preventing them from buying a 1990 Buick Century.
Conclusion
While we can bemoan the loss of a Supra or a Foxbody Mustang, lets not pretend that many of the cars in the C4C program would have been long off the road today. When was the last time you saw a Plymouth Voyager or first gen Taurus actually being used as a daily? Even if the car had escaped destruction, I doubt your favorite local rage baiter who posted a C4C article would actually want to drive one.
In 2025, C4C has very little affect on the used car market. With the prices of steel ever climbing, the demand for scrap will continue to go up, and as long as labor rates stay high, many fixable “junker” cars will continue to find their way outside of the US’s borders to places where they can be fixed on the cheap and back on the road. The rise of automotive flippers and the ease of finding cheap cars through online forums like Marketplace has made finding cheap cars a challenge but not impossible. My yard full of sub $500 Volvos, and my daily for years was an $700 Volvo 960 wagon. So next time you see someone say that C4C killed the used car market, ask yourself if they are being genuine or just there to drive engagement.
11-16 Ford F250 / F350 Super Duty - Definitive Flow-Through Center Console Install Guide
FOREWARD
On the 2011 - 2016 F-Series Super Duty trucks, the lower end models were specced with a front bench seat, with the folding middle seat also serving as a center console. These serve their purpose, however people may find the cup holders to be lacking, and the dead space a bit of a waste by their feet. In this guide we will be going over everything you need to know and do, to properly install one of these center consoles.
PREREQUISITES
For this job we will need the following tools and items:
Socket Set (Sizes from 5mm to 21mm are needed)
1/4, 3/8, and 1/2 wrenches / impact drivers
Various socket extensions
Screw drivers
Picks / Trim Tools
Wire Strippers (and wire + solder joints / soldering iron)
Misc. other tools may be needed
Items to order:
Dash Bezel: BC3Z-2504608-CB
Airbag Control Bezel: BC3Z-25047A04-BA
Obviously you will also need a complete center console, however they can no longer be ordered new from Ford and will have to be found on a local marketplace. Make sure to check the one you buy comes with all the various bolts, covers, brackets, etc.
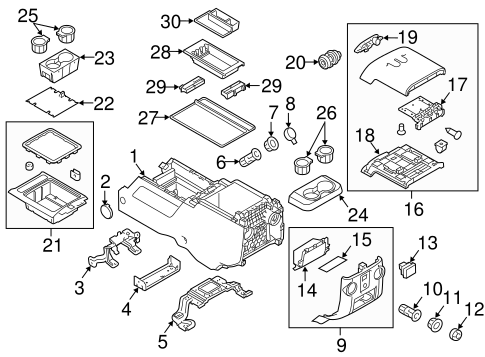
For the full diagram with parts, go here: https://www.oemfordpartsdirect.com/v-2013-ford-f-250-super-duty--xl--6-2l-v8-flex/body--front-console
We will be referring back to this diagram at certain points in the install.
Build Process
Center Console Prep
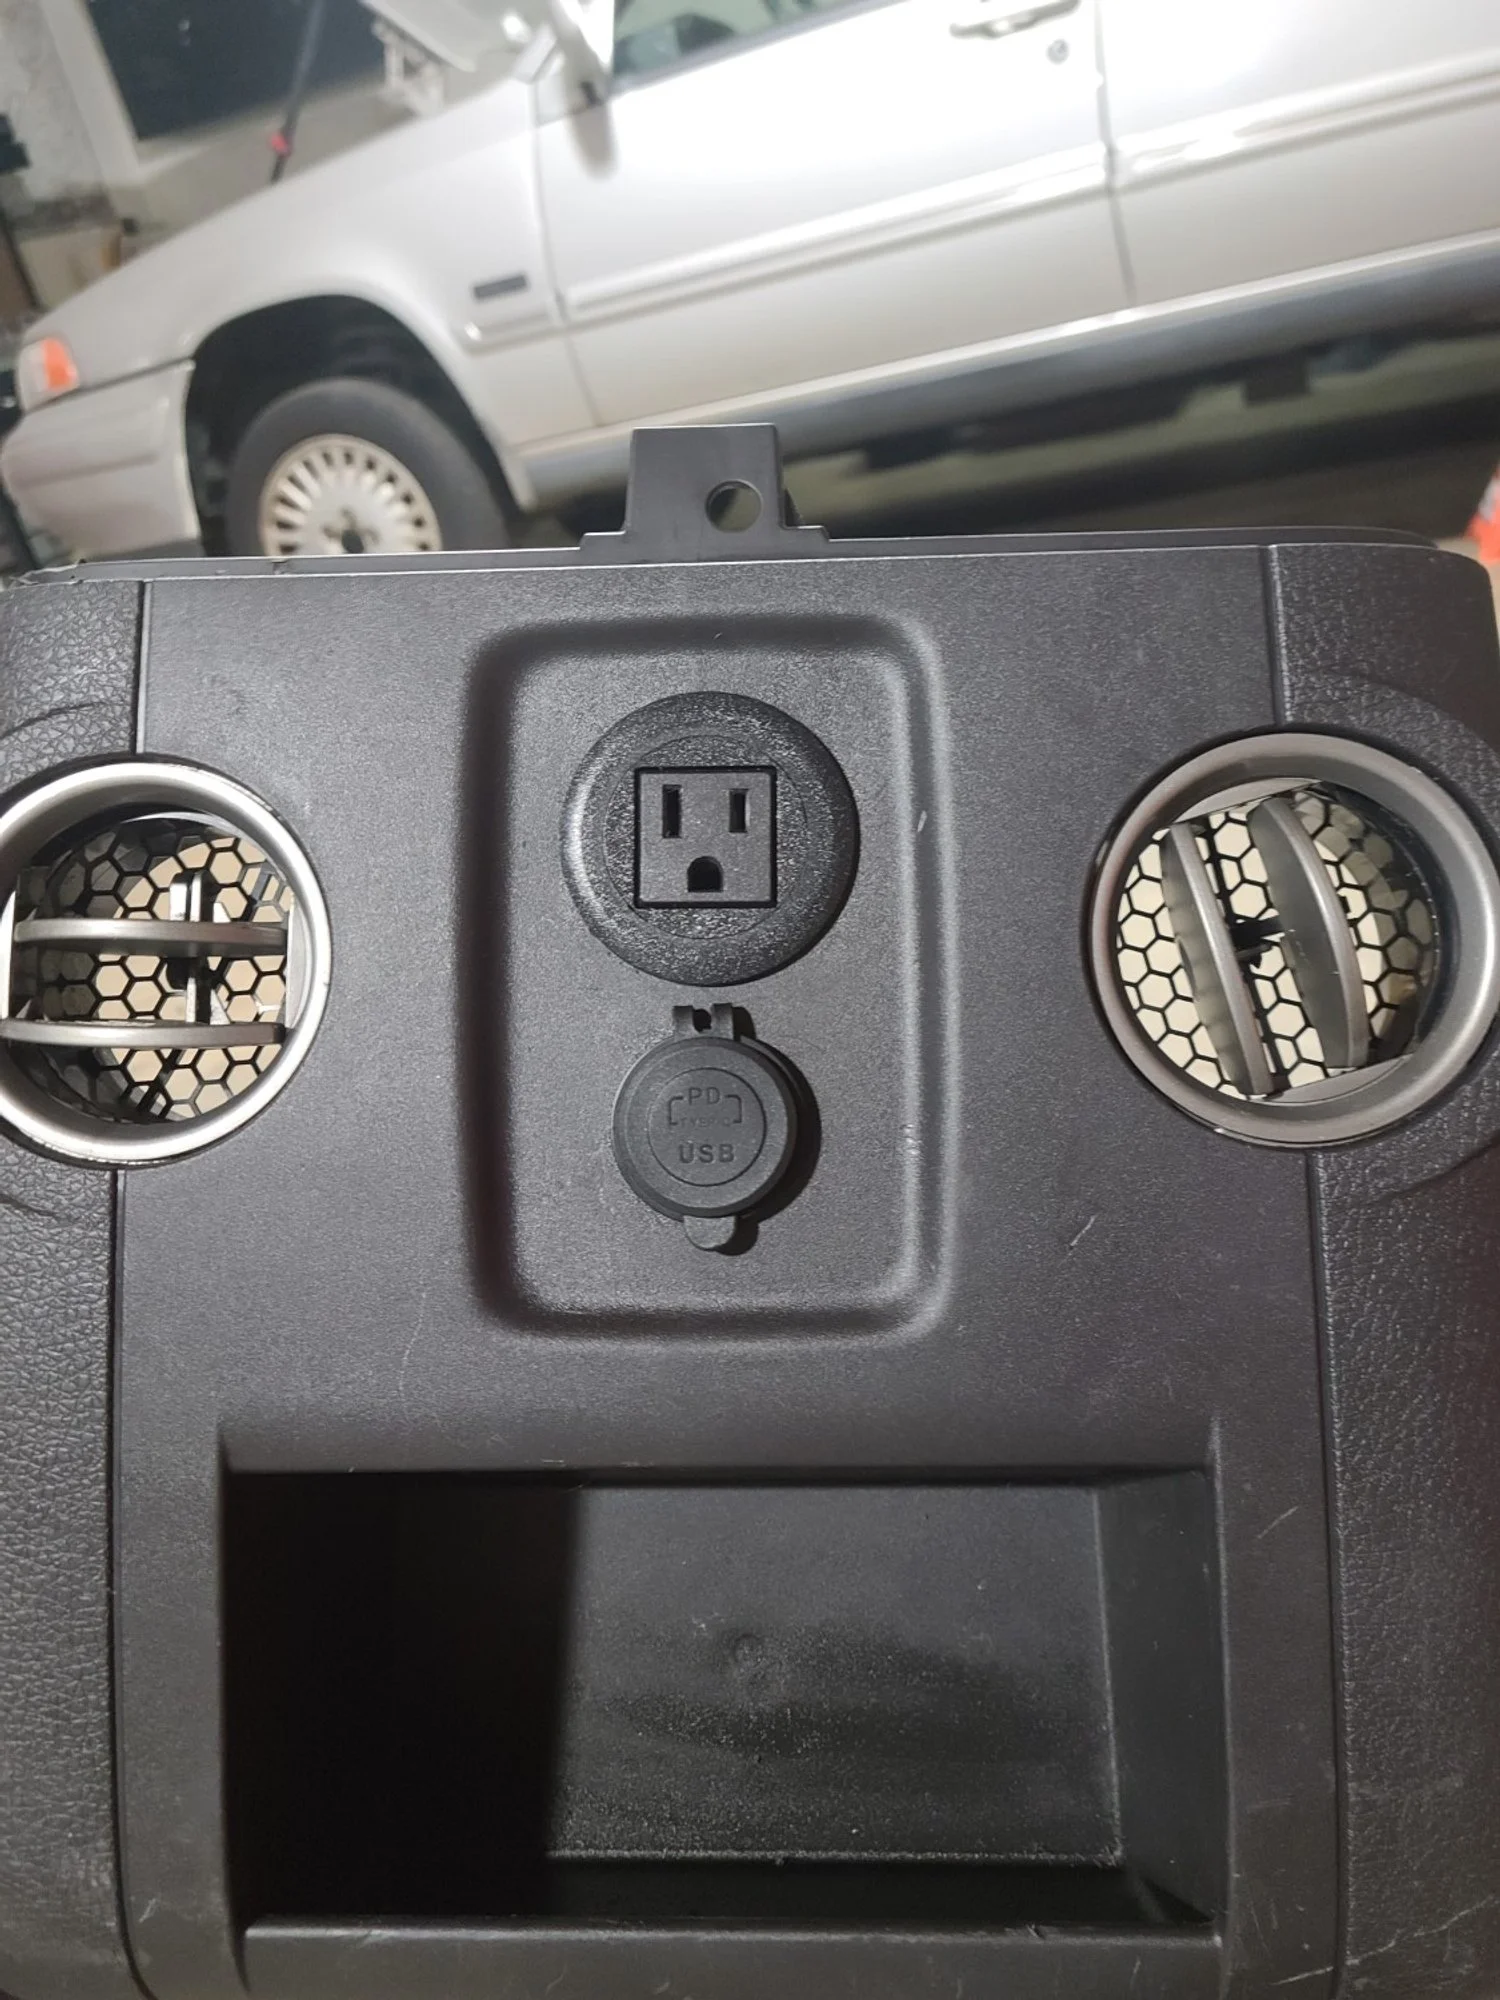
From the factory, the flow through console has 3 additional power ports installed. 1 110V inverter outlet, and 2 standard 12v lighter sockets. On higher trim trucks, there is a harness under the carpet that runs to single plug on the side of the console to give these ports power. However on a XL trim truck, such harness is not there. Additionally the inverter needs a CANBUS signal to turn on and off, which can be a pain when trying to integrate the OEM inverter. For this project, I ended up buying a basic inverter off Amazon, which had the same 150W output as the stock inverter. (Its worth noting this is a very small amount of wattage, and a much beefier inverter could be easily fit into the large space of the center console for powering high wattage power tools).
In the above diagram, I removed panel 9 to replace he 110V plug and the lighter socket. Since the OEM 110 plug has a proprietary harness, I replaced it with a “screw in” type that is designed for a desk or other flush mount applications, this means I can easily plug it into the output of the inverter.
Links to the items used:

I used basic Velcro strips from Lowes to hold the inverter in place inside the panel. I used TESA tape on all the wires in different areas to prevent anything from rattling around when installed.
The installation required a little bit of dremeling / filing of the stock mounting points so that the round barrel of the flush mount kit could be installed.

For power I made 2 very simple harnesses. The 150W inverter got its cigarette port end chopped off, and replaced with a basic 2 pin deutsch connector. This harness will connect to Upfitter switch 1 under the dash which can supply up to 25A, and is a switch power source. The OEM lighter socket under the arm rest and the rear 12V USB port were wired together to share power and ground, and were also given a 2 pin deutsch connector. I used different ends on the 2 harnesses on the center console so they could not be mixed up when connecting them to the truck side harness.
Interior
Starting off we need to remove the two regular seats from the cab of the truck, along with the center jump seat. To remove the two main seats you need to first remove the circular covers on the feet.

Photo of one of the rear seat bolt covers. The small trim screws do not need to come off, letting the piece stay attached to the foot. Just remove the center circle with a pick.
There is one on each foot of the seat (4 per seat) and you will now have access to the 21mm bolts that hold everything in place. Undo these 4 21mm bolts.
Now with the seat unbolted, lean it back so you can access the harness. Pull the grey handle down to release the harness from the seat. Repeat this process on the passenger side.
To remove the center jump seat, there are 2 bolts on the back feet which are directly accessible. The two remaining bolts holding the seat in require the bottom hold of the seat to be folded up.

There are trim clips holding the seat bottom down, pop these out and lift to access this area while the seat is in the truck.
With the 4 bolts from the jump seat removed, it can be lifted up and out of the vehicle.
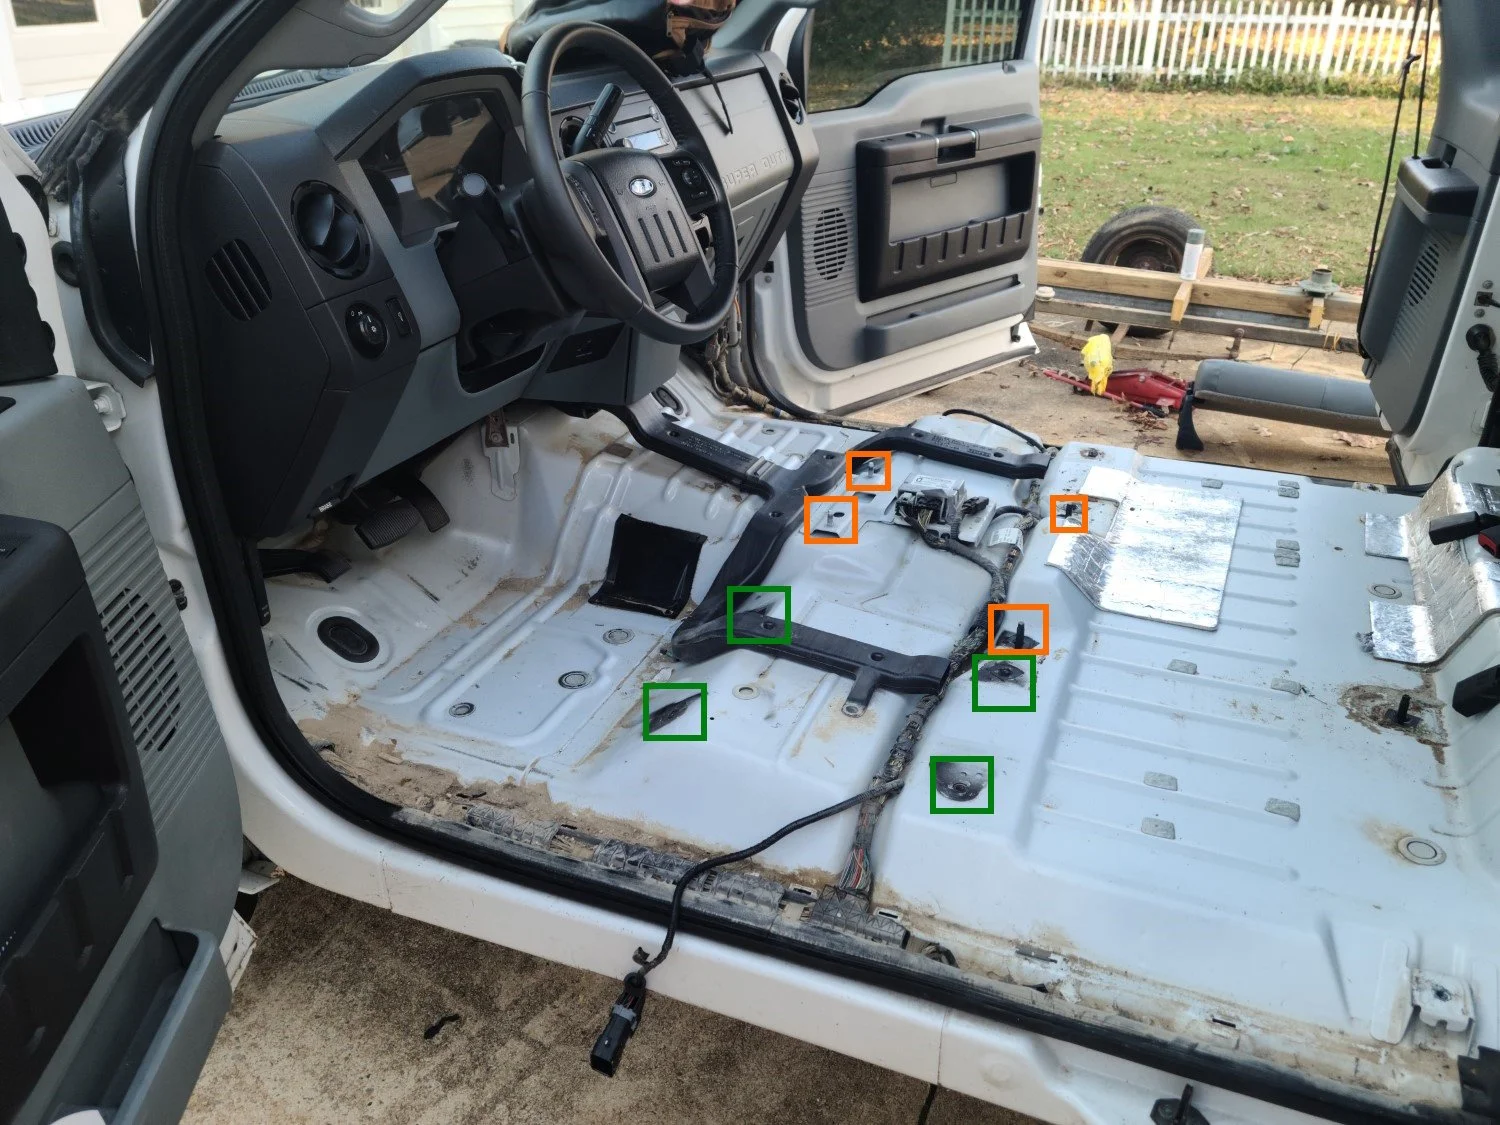
I removed the rubber flooring of my truck to install carpet, but this gives a better view of where the bolting points are in the vehicle.
In the above photo, you can see the green boxes are where the drivers seat bolts through the cab, and the orange shows the 4 standoffs for the middle jump seat / flow through console mounting points.
With the interior space now freed up, I installed my carpet and also ran the 2 lines for the plugs into the center console. These can also be installed over existing carpet since the console would cover them.
The power for the inverter went to upfitter switch 1, which is the solid yellow wire under the dash. As previously mentioned, this is a 25A circuit with its own switch on the dash and fuse, so it should be able to handle the 150W inverter without issues.

Once the wires were in place, I installed the center mounting bracket for the center console. This is held in with 2 of the bolts removed from the jumpseat (the ones under the front of the seat). This is part #4 in the diagram at the top.

The center console mounts to this via 2 7mm bolts on the sides.
With the mounting bracket in place, and the wires run we now need to replace some dashboard trim. From the factory the XL trim trucks have a flip out cup holder below the radio and AC controls, this panel will be replaced with the bezel mentioned in the beginning that needs to be ordered. To replace this, we need to remove the face plate of the dash along with a couple bolts.
This guide does a good shop showing how to access these bolts and get to the panel: https://www.youtube.com/watch?v=AnhCNoWoSBo
While that guide is showing how to install cup holders on an even more basic trim truck, the steps are identical for the new “slot” piece for the flow through console to connect to.
Removing the panel under the steering wheel also makes it very easy to access wiring and everything else youll need to install. The faceplate is held in with 2 7mm bolts and the rest is clips, whereas the bottom cup holder is held in with 3 7mm bolts (one hiding behind the lower part of the panel under the wheel) and two living behind the face plate. Additionally there are the 2 Torx bits in the middle (which you can see the holes for in the above photo) which also need to be removed.

Now it is worth pointing out that my center console came with the front mounting bracket (part #3 in the diagram). This supports the AC vents for the console. Since I was not planning on removing my whole dash to install the piece to have air flow through my console, I removed this bracket and the AC vent piece from the underside of the console.

The removed piece from the flow through console. On trucks where you have AC passing through to the rear vents, this is used to connect to the dash air system. For my setup, it was not needed.
I have not noticed any structural issues with it being removed.

The piece pictured above will need to be replaced. The item to order is mentioned in the beginning, and the lock barrel moves to the small trim piece with 3 5.5mm screws.

Now with the new lower trim piece installed, we can button the dash back up and then slide the center console into place. The two rear feet fit over the existing bolts, and line up the bolt holes on the sides to screw the 7mm bolts into the center support bracket. The console has guide pins which do right into holes in the new dash trim to keep everything aligned.
NOTE: When I re-used the nuts for the rear standoffs the hole in the center console foot was too large and the nut went right through it. I made a small washer for the one side which fixed the issue.

With the center console in place you can put the optional trim pieces over the rear feet. Installing the seats is the same process as removal but in reverse.
Once the seats are back in, the install is done!
Conclusion
There are a few parts of the process I wish I had gotten better photos of. I plan on making a video supplementing this guide which can show some more areas I had any issues with or I want to make even more clear. If you have any suggestions or edits you would like to see made, please leave them in the comments below, thanks!
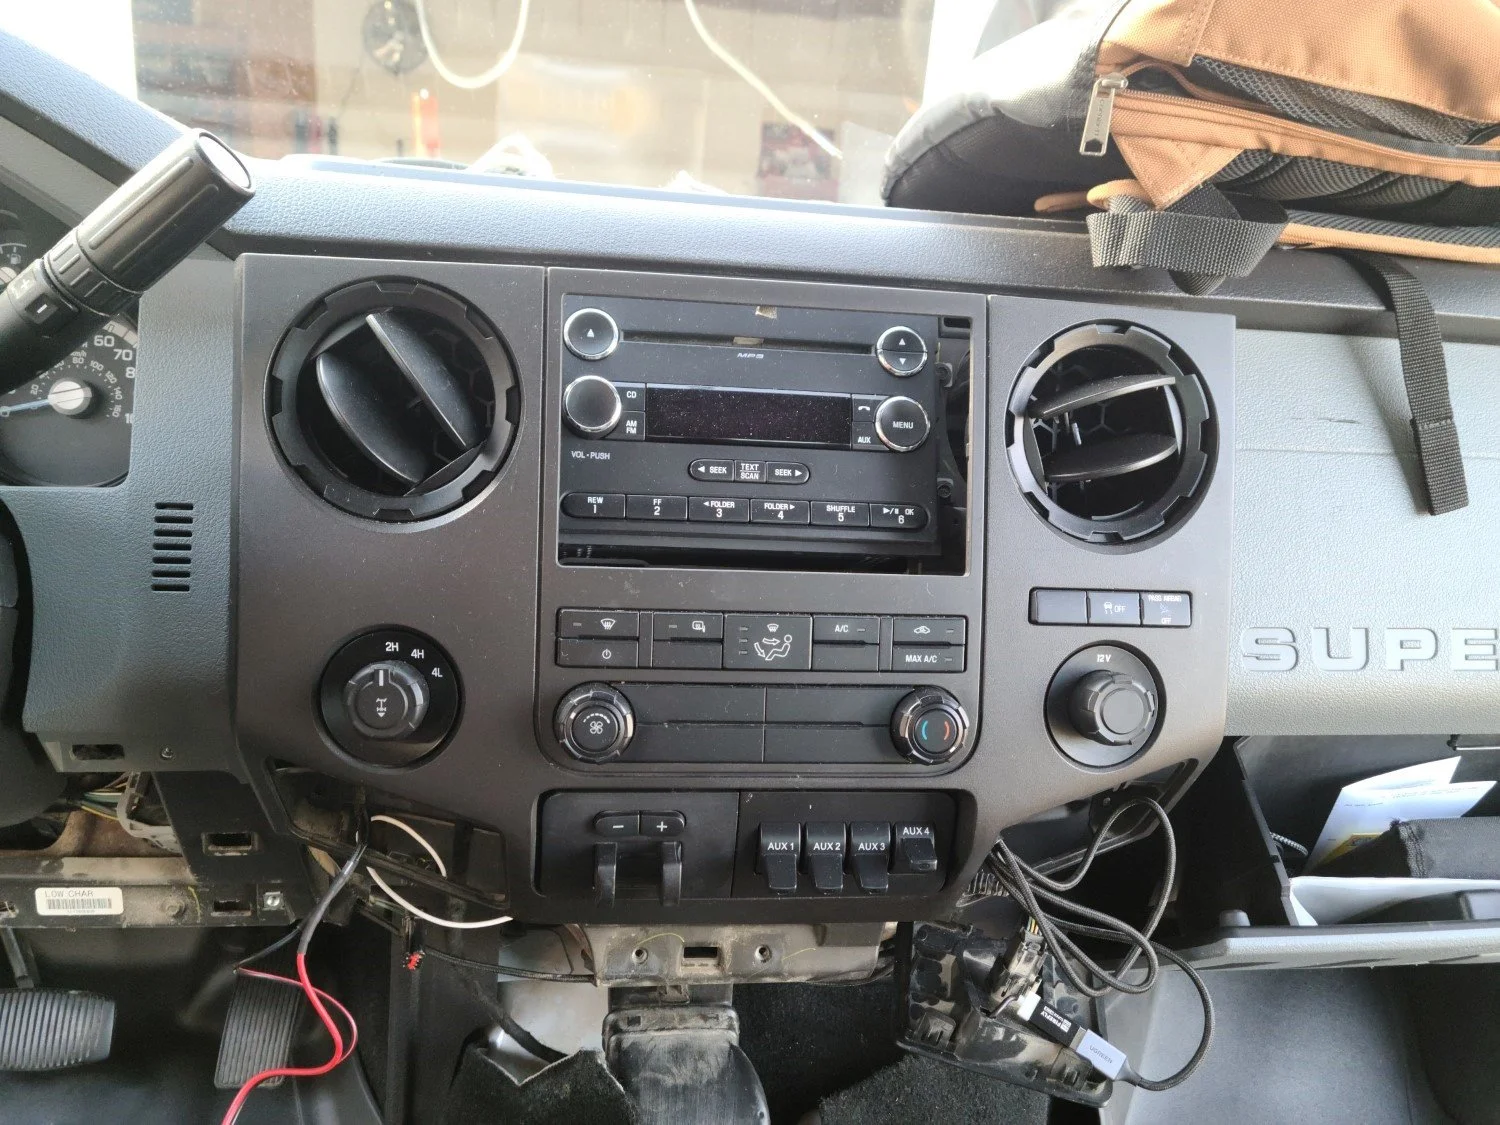
13-16 F250 Steering Wheel and Audio Control Upgrade / Retrofit Guide for Dummies
Foreward
So since I last did a car related blog post on here, I was adding a trans cooler to my Volvo XC90. Due to it not meeting my needs, and buying a bigger car trailer for the business I decided to upgrade to a 2013 Ford F250, XL trim. This means my truck is about as barebones as it gets. Lots of blank switches, rubber floor vs carpet, etc. Its perfect for my needs around the house and for the business, but in my experience the forums and youtube guides on fixes and upgrades leave a lot to be desired. There is too much fragmentation amongst the different model years, and the truck being made from 1999-2016 means a lot of guides change over time with the chassis. Couple that with the fact that forums exist not only for the different year models, but also by the engine they came with. So with that all being said, here is my definitive guide on how to install an upgraded steering wheel, and add the steering wheel audio controls to a 2011+ Ford F250 / F350.
Prerequisites
Tools you will need:
Windows Laptop
5.5mm Socket
T50 Torx Bit
Basic set of sockets, wrenches, and screwdrivers
Items to Order:
Ford Super Duty Lariat Trim Leather Steering Wheel, PN: DC3Z3600CA
Build Process
To start, we will be replacing the steering wheel. This is a fairly straight forward process so I will not get into the finer details since guides on how to do this are more than plentiful. Removing the steering wheel shroud is required to access the 3 clips holding the airbag on, and this is what we need the 5.5mm socket for. Why Ford used a 5.5mm instead of just a regular Torx bit is beyond me. We can hold off on disconnecting the battery until we have the airbag popped out of its clips since the wheel needs to be turned to access each side.

From here we will remove the center bolt holding the wheel in place. Unlike the Volvos I usually work on, this bolt was in there TIGHT. I used a 1/2in. T50 Torx bit on my impact gun to break it free, even my 3/8 Dewalt couldn’t get it to budge. Keep this in mind for reinstallation.
With everything unclipped and disconnected. we simply reverse the process to add the new steering wheel in. I transfered over my cruise control panel since the new steering wheel came with controls for the Lariat cluster, which has slightly different buttons.

Now with the new wheel and audio controls installed, we need to hop onto our laptop and do some basic programming to get everything to play nicely. There are separate guides on how to get Forscan installed on your PC, but its really as simple as downloading the program, and installing the device driver on your PC. (The unit I linked and used for this comes with very easy to follow install instructions).
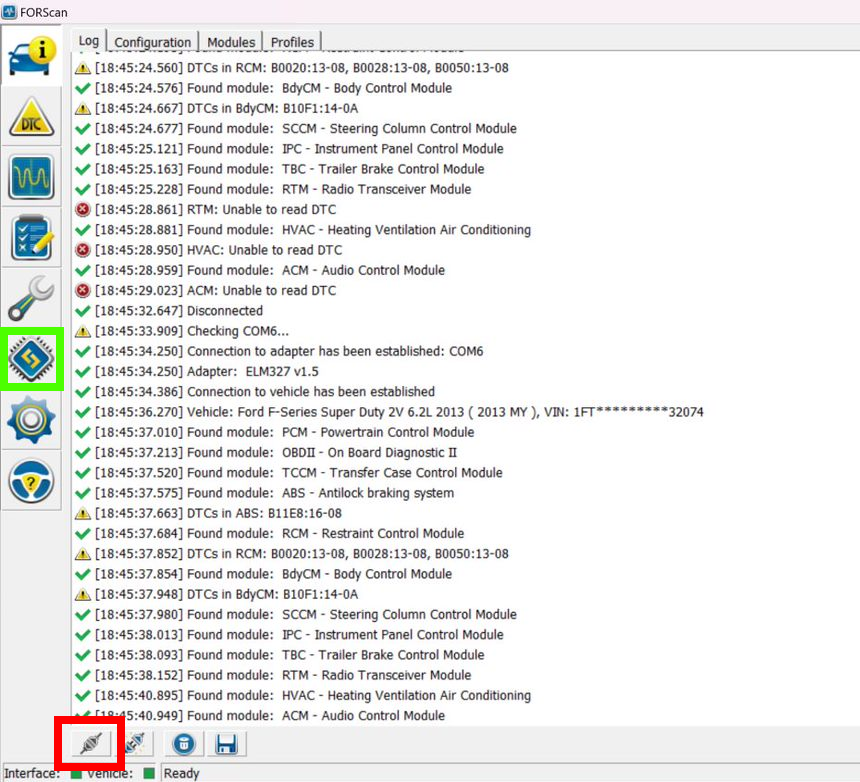
Starting with the red highlighted area, we will connect to the vehicle and read all the modules. Then, clicking on the green icon we will go the the module Configuration and Programming page. We need to change some hex codes for 2 modules. The first one will be the SCCM Module (AS BUILT), select the module and click the play button at the bottom. (Highlighted green) You will be taken to the following screen:

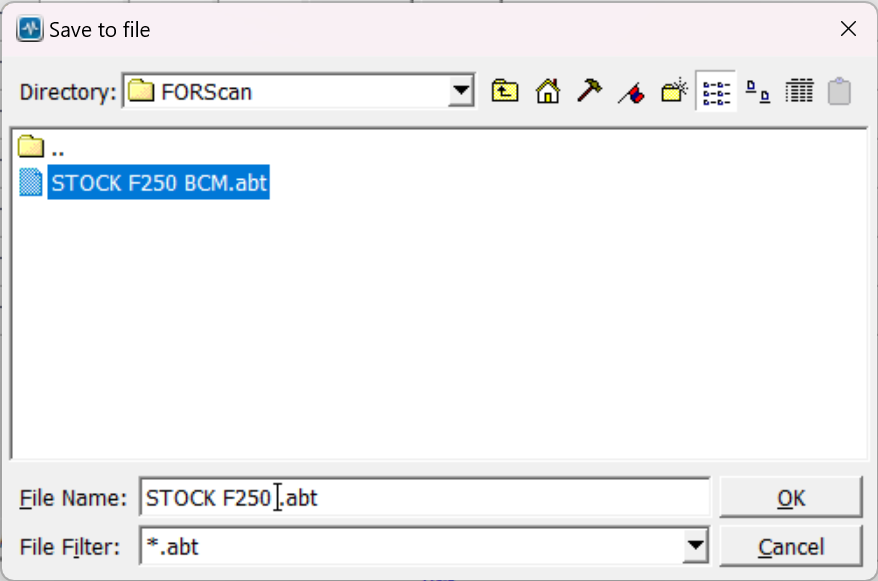
Once in the page we will click the Save All button (highlighted in red). This will open a window where we can save the stock configuration of the module. This is just a precaution incase of a flash failure. Make sure to back these up to a cloud service or onto multiple drives.
Next in the blue highlighted area, we will change the hex data to the follwing:
724-03-01:
0505 0006 3F
Once those 3 fields are changed, click the Write button next to it. Once you have done that, save your configuration again using a different name. Then click the STOP button (next to the green highlighted area), to exit out of the SCCM config page.
Our next step now will be opening the ACM Module (AS BUILT)

Before making the changes, make a backup of the stock ACM config using the save SAVE ALL button as used in the previous module steps.
Now lets change the two lines of data in the blue section:
IMPORTANT Authors NoteS:
(Update 1)
8/7/24 - After doing this configuration, I noticed that my radio lights were not working. This was a fault of the code I used which was pulled from a separate guide. To fix this issue, I found a same year model, higher trim of my truck (in this case my truck being a 2013 XL model, and the “found” vehicle being a 2013 XLT) and replaced the two lines with the as built data from that truck. Here is how I did it:
1. Locate a higher trim model of your truck (XLT+, with Sync is prefered, do not use a truck with the bigger screen option). I used AutoTrader for this.
2. Copy and paste the VIN here: https://www.motorcraftservice.com/AsBuilt
3. Scroll down to the ACM Module As Built
4. Copy the first two lines to your trucks ACM config
(Update 2)
8/14/24 - I had an issue with the codes that I used. While at first everything seemed to be working, after turning my radio off one day, my radio starting displaying NO AUX INPUT FOUND. So clearly there is something wrong with the ACM codes I used. Due to this, I compiled a list of ACM codes I have found from various trucks into this spreadsheet. I will be using a new programming cable and testing these various codes to find which one works best for my system. Once I find one set that works best, I will update the ACM codes below:
727-01-01
0400 90BB A625
727-01-02
0031
With these two lines changed, click the WRITE ALL button (highlighted in green), and then make a backup of your modified ACM.
The two modules should now be successfully changed, so lets try out our steering wheel controls!

Conclusion
This retrofit is a must if you have a base model F250 or F350. Even if you want to keep your stock wheel, you can use this guide to add just the new steering wheel controls as the wheels all have the wiring pre-installed for them, and removal of the blank button is as simple as prying it out. I still need to figure out the phone controls on the wheel and with the radio, but its not a top priority for me at the moment. I hope this guide helps, and please feel free to share it amongst truck groups, or leave a recommendation down in the comments on what could be done better or different.
Archive
-
2025
- Dec 15, 2025 11-16 Ford Super Duty Remote Start Ultimate DIY Guide Dec 15, 2025
- May 5, 2025 Volvo 700 Series In-Tank Fuel Sender Assemblies - Whats the deal? May 5, 2025
- Apr 28, 2025 Store Update: Shipping Rates and Carriers Apr 28, 2025
- Jan 1, 2025 Cash for Clunkers and Todays Car Marketplace - A Mathematical Analysis on Why Cash For Clunkers Doesn't Matter Anymore. Jan 1, 2025
-
2024
- Nov 25, 2024 11-16 Ford F250 / F350 Super Duty - Definitive Flow-Through Center Console Install Guide Nov 25, 2024
- Jul 30, 2024 13-16 F250 Steering Wheel and Audio Control Upgrade / Retrofit Guide for Dummies Jul 30, 2024
- Mar 13, 2024 Misc. Project - Volvo P3 Desk Chair Mar 13, 2024
- Jan 16, 2024 The Definitive P2 XC90 External Transmission Cooler Writeup Jan 16, 2024
-
2023
- Aug 8, 2023 TFT Display with P3Tool Guide Aug 8, 2023
- Aug 4, 2023 Facility Upgrades and Updates Pt. 2 - Tow Dolly Aug 4, 2023
- Mar 27, 2023 Facility Upgrades and Updates Pt. 1 - John Deere 165 Hydro Restoration Mar 27, 2023
-
2022
- Sep 27, 2022 P3Tool - Volvo Hacking Takes Its Next Big Step Sep 27, 2022
- Aug 25, 2022 Project Nashville Pt. 3 - MOST Excelent! Aug 25, 2022
- Jun 28, 2022 NordCarolina Shop Update! Jun 28, 2022
- Jun 20, 2022 Project Nashville Pt. 2 - Tech Talk Jun 20, 2022
- May 12, 2022 And I Would Drive 500 Miles - Project Nashville Pt. 1 May 12, 2022
- Mar 14, 2022 On life, cars, and business. Mar 14, 2022
-
2021
- Jul 19, 2021 Volvo 960 Project Pt. 6 - Still Alive Jul 19, 2021
- Mar 12, 2021 Volvo 780 Bertone Project Pt. 2 - Why buying another persons project is the WORST. Mar 12, 2021
-
2020
- Dec 7, 2020 Volvo 780 Bertone Project Pt. 1 - In Over My Head Dec 7, 2020
- Dec 7, 2020 Volvo 960 Project Pt. 5 - Taking my time. Dec 7, 2020
- Sep 11, 2020 A Very Volvo September Sep 11, 2020
- May 15, 2020 960 Project Pt. 4 - End of Spring Almost Summer Updates May 15, 2020
- Feb 3, 2020 960 Project Pt. 3 - Always Remember Your Oil Feb 3, 2020
-
2019
- Dec 17, 2019 Nord Carolina - Starting my own E-Commerce Platform for Volvo Enthusiasts Dec 17, 2019
- Nov 20, 2019 960 Project Pt. 2 - I built it one piece at a time... Nov 20, 2019
- Oct 2, 2019 960 Project Pt. 1 - Diving In Oct 2, 2019
- Sep 20, 2019 1997 Volvo 960 Project Pt. 0 - $800 Worth of Headaches Sep 20, 2019
- Aug 3, 2019 VDASH Pt. 2 - Cloud Based Car Tuning Aug 3, 2019
- Jul 2, 2019 VDASH Pt 2. is coming.... Jul 2, 2019
- Apr 1, 2019 VDASH Pt. 1 - A new tool for a modern Volvo hacker Apr 1, 2019
- Mar 18, 2019 2013+ Shifter Retrofit Project Pt. 2 - Reconstruction and Installation Mar 18, 2019
- Feb 17, 2019 2013+ Shifter Retrofit Project Pt. 1 - Preparation and Disassembly Feb 17, 2019
- Feb 2, 2019 The P3 Common & Uncommon Repairs Documentation Project Feb 2, 2019
-
2018
- Dec 28, 2018 Mini-Post: New side skirt. Dec 28, 2018
- Dec 8, 2018 Driveability and Performance Report: December 2018 Dec 8, 2018
- Oct 8, 2018 Audio Modules & The Return to Boostmoose Oct 8, 2018
- Jul 28, 2018 The Final Report: 850R Beauty Shots Jul 28, 2018
- Jul 17, 2018 Mid-July Summer Update Jul 17, 2018
- May 15, 2018 Summer Progress Update May 15, 2018
- Apr 1, 2018 850R - Stage 0 Dreams Pt. 2 Apr 1, 2018
- Mar 18, 2018 850R - 960 Throttle Body Upgrade pt. 1 Mar 18, 2018
- Mar 14, 2018 850R - Seat Restoration Mar 14, 2018
- Jan 18, 2018 S60R - Wrap Repair + Driving the Eastern Shore Jan 18, 2018
- Jan 1, 2018 S60R - Vinyl Wrap Jan 1, 2018
-
2017
- Dec 4, 2017 850R - Better and Brighter Tail Light Installation Dec 4, 2017
- Dec 4, 2017 S60R - Holiday Charity Laps at Virginia International Raceway Dec 4, 2017
- Nov 16, 2017 850R - Junkyard Pulls for Performance & New Rear Lights Nov 16, 2017
- Nov 15, 2017 S60R - Scheduled maintenance.....yawn. Nov 15, 2017
- Nov 3, 2017 850R - Stage 0 Dreams Pt. 1 Nov 3, 2017
- Nov 1, 2017 850R - Firestone Fixes CV Axle while Suspension Nears Completion Nov 1, 2017
- Oct 28, 2017 850R - Axle Removal and CV Boots Halt Progress Oct 28, 2017
- Oct 27, 2017 850R - Air Tool Woes and Broken Brakes Oct 27, 2017